✅ Last checked on
Imagine your lights turning on automatically as you arrive, your thermostat adjusting to your preferences, and security cameras recording activity – all without needing an internet connection. Does this sound like a futuristic fantasy? It’s not only possible but increasingly necessary for modern households.
Many popular systems like Philips Hue and Insteon rely on cloud servers. When those servers go down – as they did permanently for Insteon users in 2022 – your connected devices become expensive paperweights. Even temporary internet outages can disrupt routines you’ve come to depend on.
This guide reveals how to create a truly resilient smart home using local control. By shifting automation to your own network, you eliminate single points of failure while boosting security. No corporation can disable your lighting schedules or collect data about your daily habits.
Key Takeaways
- Cloud-dependent systems risk sudden failure, as seen with Insteon’s shutdown
- Local processing keeps devices working during internet outages
- Self-hosted setups prevent third parties from accessing your data
- Automations like climate control work faster without cloud delays
- You maintain full ownership of your system’s rules and triggers
Through real-world examples and step-by-step guidance, you’ll discover how to transform your residence into a privacy-focused haven that operates exactly how – and when – you need it to.
Introduction to Offline Smart Homes
Think of technology that works like your refrigerator – always available, never needing an internet connection to keep food cold. Offline smart systems function similarly, operating independently from external servers. This approach eliminates vulnerabilities tied to corporate decisions or unstable web access.

Understanding the Benefits of Going Offline
Local systems process commands through your router instead of distant data centers. Battery-powered sensors and Zigbee devices communicate directly with hubs, reducing delays. When manufacturers discontinue cloud services, your lights still turn on at sunset and doors lock at bedtime.
Consider the 2022 Insteon shutdown. Users relying solely on cloud features lost control overnight. Systems built with local processing avoided this fate entirely. Making your home smarter through self-reliant setups prevents such disruptions.
Privacy, Reliability, and Cost Savings
Every cloud-dependent device shares usage patterns with third parties. Local networks keep your data within walls. Motion sensors and smart plugs operate faster without uploading information to remote servers.
Zigbee mesh networks extend coverage while conserving battery life. Devices last years on single power sources through optimized communication. You save money by avoiding monthly service fees and replacement costs from forced obsolescence.
Getting Started with Home Assistant
Transform any spare computer or single-board device into a powerful control center for your connected ecosystem. Unlike cloud platforms, this open-source solution prioritizes self-reliance while maintaining approachability for new users.
Installing Home Assistant on Your Device
Setting up takes under 30 minutes with minimal technical skills. Follow these steps:
- Download the software image matching your hardware (Raspberry Pi recommended)
- Flash it to a microSD card using tools like BalenaEtcher
- Insert the card and power up your device

Navigating the User Interface and Blueprints
The dashboard organizes devices by room with color-coded status indicators. Three standout features:
- Drag-and-drop automation builder for visual rule creation
- Blueprint library with 1,400+ preconfigured routines
- Device health monitors showing connectivity history
Import community blueprints to handle complex tasks instantly. Need a sunrise light routine? Apply a prebuilt template and customize trigger times. Automation runs locally, so schedules execute even during ISP outages.
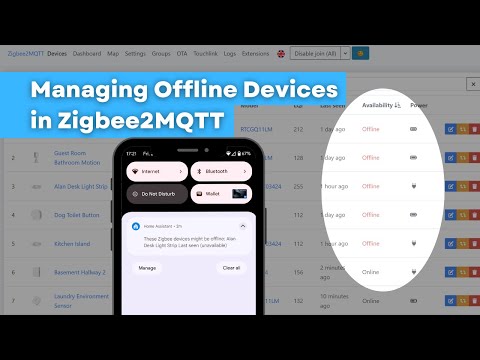
Enable ‘last seen’ tracking under device settings to spot connectivity gaps. Pair this with notifications to receive alerts when sensors stop reporting. These safeguards ensure your system adapts when components go offline unexpectedly.
Configuring Your home assistant offline automation
Picture a self-sufficient ecosystem where devices collaborate without external servers. Local systems thrive through direct communication, using your network as their backbone. This setup ensures operations continue seamlessly, even when web access disappears.
Creating Local Automations Without Internet Dependency
Start by designing rules that respond to physical triggers. Use the blueprint editor to build routines triggered by motion sensors or time-based patterns. For example, set lamps to shift color temperature as daylight fades, using your local network to process changes instantly.
Adjust settings to recognize daily rhythms. Bedside lights can dim at 10 PM while security cameras activate. These state-based rules eliminate cloud delays, responding within milliseconds to sensor inputs. Test automations using the visual timeline to spot conflicts before finalizing.
Integrating Devices for a Unified Offline Experience
Organize your network by grouping gadgets with similar functions. Zigbee bulbs and Z-Wave locks form separate meshes to prevent congestion. Pair each device directly through your hub’s interface, avoiding third-party apps that require internet access.
Prioritize privacy by disabling cloud sync in settings. Sensors report data only to your local server, keeping activity logs within walls. For multi-room setups, assign unique identifiers to track device states without external tools. This approach creates a cohesive system that adapts to your household’s unique patterns.
Enhancing Device Communication and Reliability
Reliable device communication forms the backbone of any robust smart home system. Zigbee networks require precise configuration to maintain consistent performance. By adjusting how devices report status and respond to commands, you create a responsive environment that adapts to your needs.
Optimizing Zigbee2MQTT Settings for Device Availability
Fine-tune your Zigbee2MQTT interface to prevent missed signals. Reduce ping intervals from the default 60 minutes to 15 minutes in the configuration file. This forces devices to confirm connectivity more frequently.
| Setting | Default | Optimized |
|---|---|---|
| Ping Interval | 60 min | 15 min |
| Check-in Frequency | 120 sec | 30 sec |
| Retry Attempts | 3 | 5 |
Increase retry attempts for stubborn switches. Devices behind thick walls benefit from extended response windows. Test changes using the app’s debug log to spot communication gaps.
Using Template Sensors and Blueprints for Real-Time Alerts
Create template sensors that track device states through simple code snippets. This example triggers alerts when motion sensors go offline:
binary_sensor:

- platform: template

sensors:

porch_motion_online:

value_template: "{{ states('sensor.porch_motion') != 'unavailable' }}"
Pair these sensors with notification blueprints from the community list. Receive instant app alerts when garage doors malfunction or lights disconnect. Visual dashboards display all device statuses in one interface, letting you address issues before they escalate.
Advanced Automation Tips and Workarounds
Like a well-trained nervous system, your smart setup needs reflexes that work even when cut off from external signals. Custom notifications and protocol flexibility turn temporary hiccups into minor blips rather than system-wide failures.
Managing Offline Device Notifications and Troubleshooting
Build dynamic alerts using Home Assistant’s template sensors. Track when lights or sensors stop responding with code snippets that trigger app notifications. For example:
“Status-based alerts act like smoke detectors – silent until something breaks.”
Pair these with Zigbee2MQTT troubleshooting methods to identify weak network paths. Adjust signal repeaters or router placements based on error logs.
Privacy settings let you control which devices share data. Use these configuration options:
| Device Type | Data Shared | Access Level |
|---|---|---|
| Lights | Power state only | Local network |
| Cameras | Motion alerts | Admin-only |
| Sensors | Room occupancy | Encrypted |
Exploring Additional Protocols: Thread, Matter, and Zigbee
Thread protocol reduces latency for lights and switches through self-healing mesh networks. Matter standardizes communication between brands, letting you mix devices without compatibility headaches.
Compare key features:
| Protocol | Range | Power Use |
|---|---|---|
| Zigbee | 50-100 ft | Low |
| Thread | Extended via routers | Ultra-low |
| Matter | IP-based | Variable |
Custom dashboards unify these elements. Group devices by room or function, using color-coded status indicators. Drag-and-drop widgets display real-time updates for critical things like battery levels or signal strength.
Conclusion
Building a self-reliant smart setup requires careful planning, but the payoff lasts for years. By following the step-by-step process outlined here, you’ve learned how to configure each part of your network for uninterrupted operation. These choices shape your world of connected tech – prioritizing privacy and control over convenience.
Reliable systems demand regular checkups. Test your setup every few months to catch firmware gaps or signal weaknesses. Upgrade routers strategically to strengthen coverage in dead zones. Every component, from motion sensors to smart plugs, plays a critical role in maintaining consistency.
Explore video guides from trusted creators to refine your configuration further. They demonstrate advanced techniques like custom dashboards and energy monitoring. Remember: each upgrade point you implement today builds a more resilient tomorrow.
Your journey toward tech independence starts with one deliberate choice. Review your current devices, map out improvements, and take that first step. The result? A tailored ecosystem that works precisely how – and when – you need it.